Count of employee based on months and job grade (raw data doesn't have rows and columns)

Hi all,

I would like to ask for help with my current task which is achieving the view below:

image

from raw data like this below( example attached ) :

I have 3 separate spreadsheets ( 3 different locations as I need to put a slicer on Locations as well) already uploaded in PBI and an example of what I need to display.
16.01.23 - three locations.pbix (105.2 KB)

Location 1 forum 16.01.23.xlsx (34.2 KB)
Location 2 forum 16.0123.xlsx (33.2 KB)
Location 3 forum 16.01.23.xlsx (35.1 KB)

example.xlsx (35.8 KB)

Would you please help me to link all 3 spreadsheets and perform steps for modeling in order to achieve the expected matrix chart for every month of the year, chosen location, and job grade?

Many thanks,

Iwona

1 Like

Hey @Iwona
I have created this Solution for you.

A few things to know.
Would be great if you can start pulling in data in the Format :

Date||Location || Grade|| Number of Employees

if that’s not possible, you will need to go through the transformations I have created in the data. I have applied the same set of transformations to the 3 data files that you have shared and Append them.
On the Final Fact Table, I created a Full Date Column. Assuming that the data is for 2022.

Do check the steps i have applied for transformations on your raw files.

Here is the Working file Iwona.pbix (201.9 KB)

I hope that helps.

Let me know if you have any questions

1 Like

Hi @jps

Many thanks for your priceless response and help.
Would you please guide me on how I should change the source of tables?
I am trying to link them with my current location but no success

And even if I eventually change this yellow marked part it shows me an error in one of the steps in each table.

Could you please help here.

Grateful for your knowledge/expertise/time/ support.

Iwona

N.W . Unfortunately, I am unable to pull in data in the advised format.- there is no other option and I have to deal with what I already uploaded :frowning:

Hey Iwona,

I am sorry, It didn’t work for you because I forgot to mention something and without this information, your connecting PQ to your excel files would still not have worked.

I renamed the Sheet / Tab name for excel files based on the location they belonged to.

remember that when updating the actual location names, ensure that they are consistent in all your files. the way you name it here is how it will appear in your report

ss

Here are the Excel files for your reference.
Location 3 forum 16.01.23.xlsx (35.1 KB)
Location 2 forum 16.0123.xlsx (33.2 KB)
Location 1 forum 16.01.23.xlsx (34.2 KB)

Let me know how it goes for you.

1 Like

hi @jps

My original files name is like ‘2023016 02 DF’ or ‘20230116 03 ZD’ which this date is date of downloading the extract from software and 02 DF/ 03 ZD are names of the location. I have 20 locations ( 20 separate files)

What is the best practice to swap current name to original ones and split them in table to get in columns " location" and " extract date" .

Could you please advice on that topic.

Extremely grateful for your mercy :wink:

Iwona

Hey @Iwona ,

With those details, it made more sense that we use the Year and location from the file name instead of manually adding it as I prepared in the previous PBX for you

So here is how I have prepared the new file for you.

PBIX is set to get pickup all files that are saved in a folder Named: “Documents” and combine all the files together

Files are named as :
20230116 02 DF
20230116 03 ZD
20230116 04 AB

PBX will pickup only files that have the “.xlsx” extension

So you can create a folder and whenever you download the files, start saving all your files in this folder and point PBIX to connect to this folder.

The format of filenames must remain unchanged.

Here are the files for your reference.
Iwona V2.pbix (211.1 KB)
20230116 02 DF.xlsx (34.2 KB)
20230116 03 ZD.xlsx (33.2 KB)
20230116 04 AB.xlsx (35.1 KB)

I hope this helps.
Let me know if you have any questions.

Hi @jps
I have noticed that January in each location displays data incorrectly.
I think this because 1-13 January are blank cells ( no data) and I have no clue which kind of step will solve this problem.

image

Could you please help.

Many thanks,

Iwona

Hey @Iwona

That is happening because your raw files have the same months repeated several times

Since we are picking up the year from the file name, it assumes every time the month January Appears, It belongs to the same year, and produces the result accordingly.

Data Quality is Important. you should have a separate file for every year. otherwise, you will get the wrong results.

For purpose of clarity, I have removed the repeating months from all files and replaced blanks Values ( between dates 1 - 13 January) with ‘0’

and we now have the following results.


Here is the PBX
Iwona V2.pbix (214.3 KB)

Here are the Attached Raw files
20230116 02 DF.xlsx (27.2 KB)
20230116 03 ZD.xlsx (32.9 KB)
20230116 04 AB.xlsx (34.6 KB)

I hope that helps. Let me know if you have any other questions.

Hi @jps

Extremely grateful for your quick response and your care.

All my 17 files ( 17 locations) are placed in Share Point and connected directly with PBI.
Should I go to each file and add zeros manually or is there anything else I should do there?

Many thanks, Iwona

Adding a 0 is optional, the only difference is that, if your file has null / Blank value, for all grades for example dates 1-13, these dates will not appear in the matrix. but having a 0 will show the dates with a 0

@jps

I have added “0” to all files but still getting weird numbers for 1-13 January in PBI for every location.

Iwona V2 (1) wrong values.pbix (214.0 KB)
20230116 02 DF.xlsx (34.4 KB)
20230116 03 ZD.xlsx (33.5 KB)
20230116 04 AB.xlsx (35.4 KB)

:frowning_face: I checked everything :frowning:
Iwona

Your file has repeating Values - Below screenshot from same file,

see the row numbers and month number and data agains that.
Infact in this file, when you scroll down you will find other months are also repeating

1

@jps
I have checked with my boss and actually, this file is wrong. There is another correct extract
20230116 02 DF new correct version.xlsx (23.1 KB)

Could you please help me to differentiate these two Januaries - January 2023 and January 2024? There are no years in this extract and ‘year’ should be produced manually but I don’t know how :frowning: I think the data will be added within the time so I need to get this done for all months onwards and for future years.

Many thanks,

Iwona

Hey @Iwona ,

So what i understand that your file name has the year 2023, but the data in it is for 2023 and 2024

I think the best way forward for you should should be, saving the file separatly for every year

Hi @Iwona,

We noticed that you have not responded to @jps question last Jan 22. He’s waiting for your response to help you further on this inquiry.

In case there won’t be any activity on it in the next few days, we’ll be tagging this post as Solved.

@jps

Many thanks for coming back to me,
What would you advice? as I have to do all work manually .

Iwona

Hello @Iwona ,

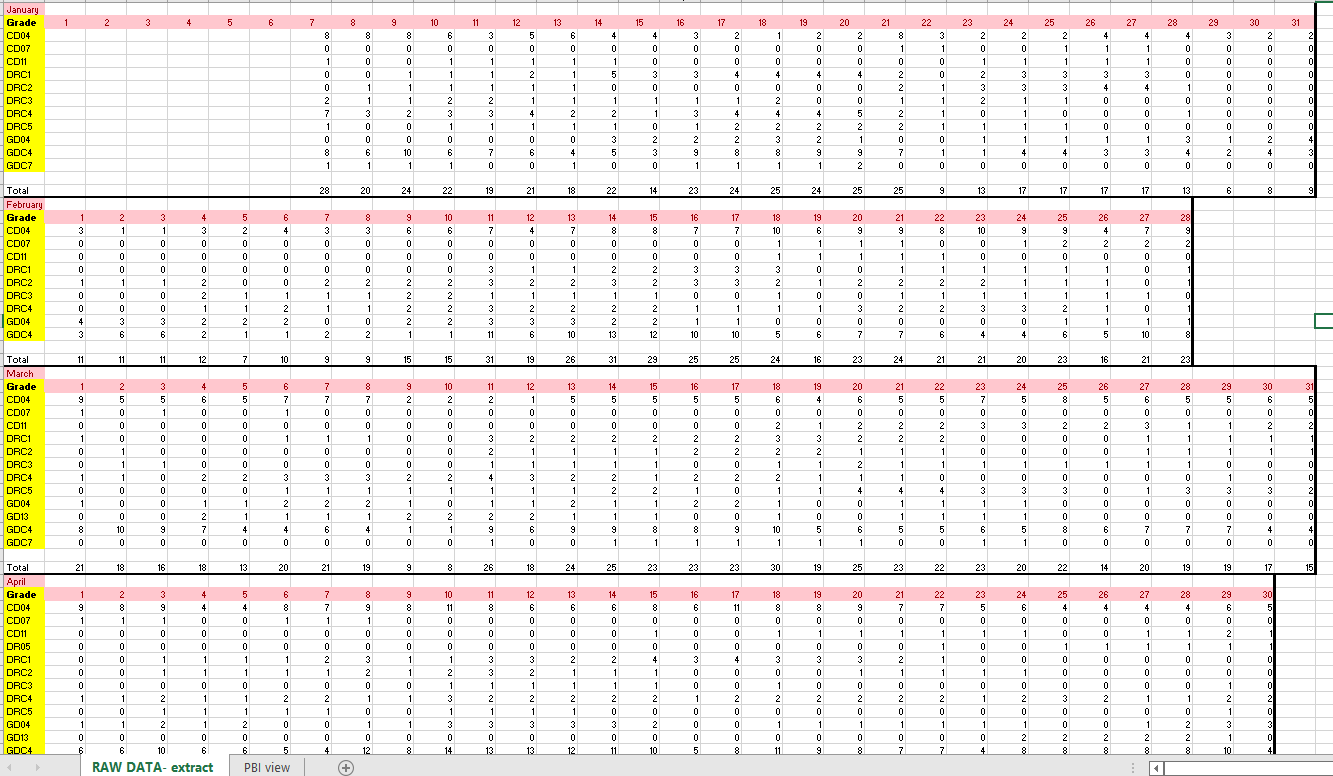
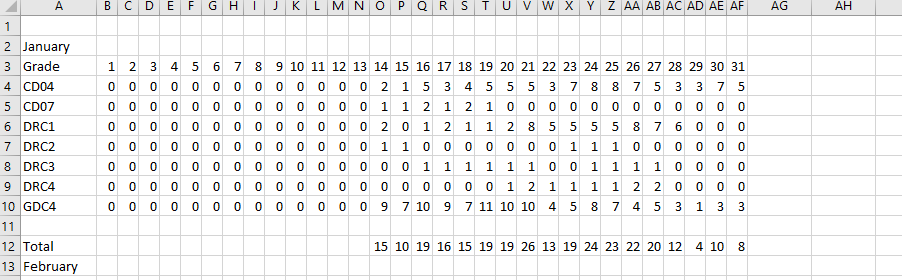
  1. Don’t work manually on your files. You can leave them untouched.
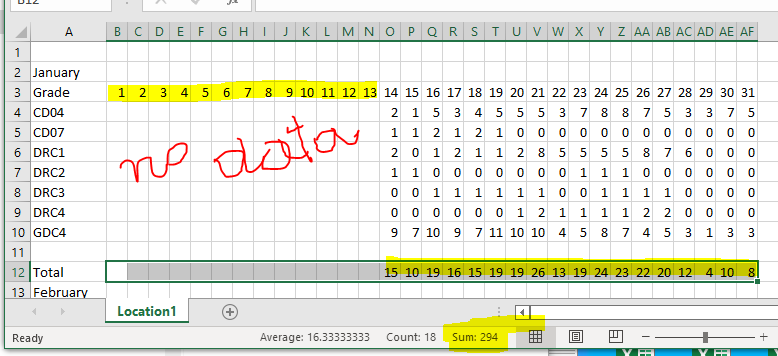
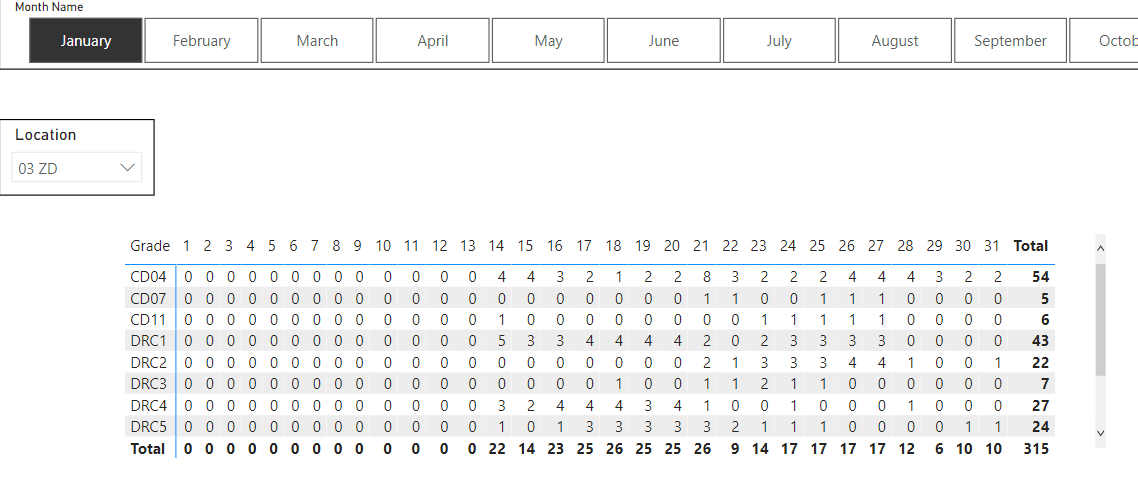
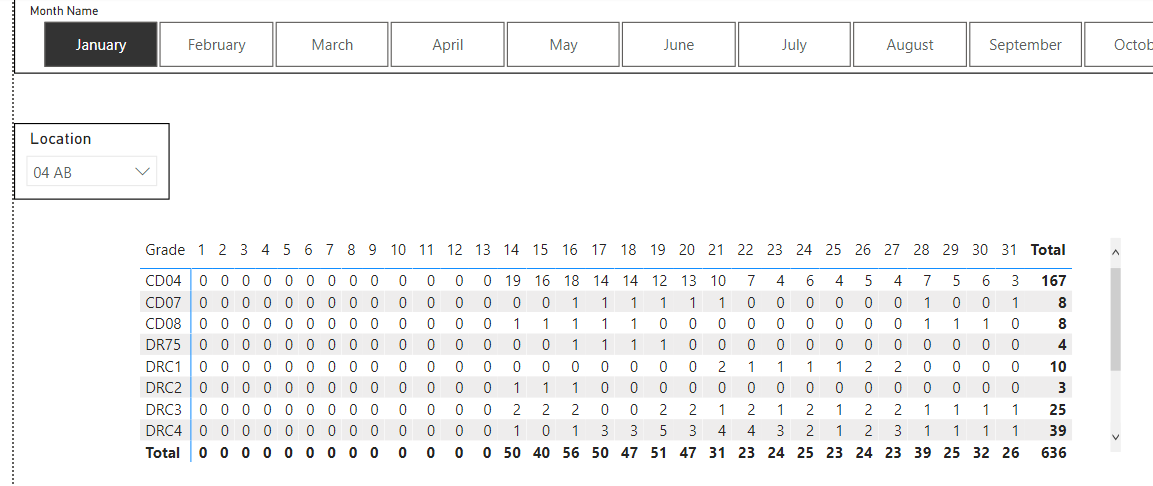
  2. Do not add any 0 to your data. Normally you filter all 0 values out. I did in the code below!
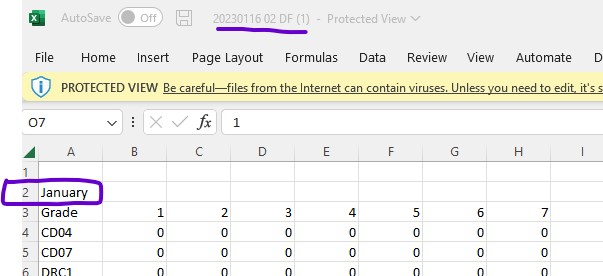
  3. Make sure that the file date is within the first month of your data (start month). I noticed that you have data some days before the download date. Normally that is no problem, but if you are near a month change make sure that the download month matches the month of the first data entries.
  4. Have all of your 20 data files in one dedicated folder. It makes your life easier if you do not have to filter for these 20 files (difficult to identify as they all have different names).
  5. Add a query fxRunningTotal. Add a blank query, copy the below code in the Advanced Editior and name the query fxRunningTotal. This query (function) will give you the information how many months are added after the start month:
(grouping as list) as list =>
let
    GRTList = List.Generate( 
        ()=> [ GRT = 0, i = 0 ],
        each [i] < List.Count(grouping),
        each try 
                if grouping{[i]} = grouping{[i] + 1} 
                then [GRT = [GRT], i = [i] + 1]
                else [GRT = [GRT] + 1, i = [i] + 1]
            otherwise [i = [i] + 1],
        each [GRT]
    )
in
    GRTList
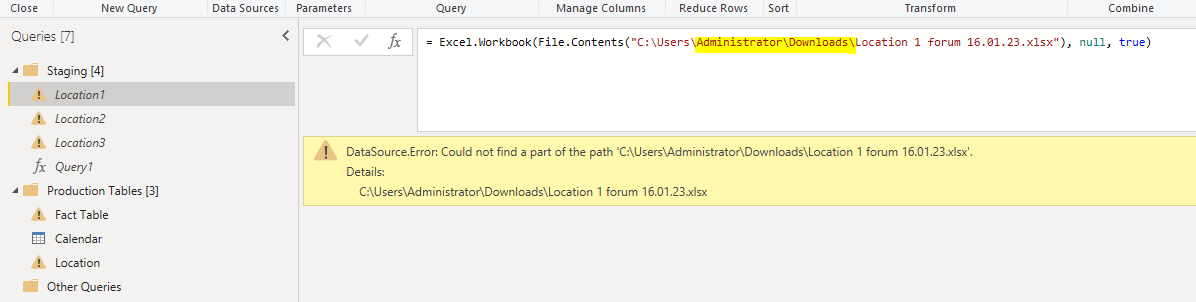
  1. Use this code, but adapt the FolderPath. What you will get is a rolling data base, which takes automatically care of changing years.
let
    Source = Folder.Files("C:\YourPathToTheDedicatedFolder\"),
    #"Removed Other Columns" = Table.SelectColumns(Source,{"Content", "Name"}),
    #"Added Custom" = Table.AddColumn(#"Removed Other Columns", "Custom", each Excel.Workbook([Content])),
    #"Removed Columns" = Table.RemoveColumns(#"Added Custom",{"Content"}),
    #"Expanded Custom" = Table.ExpandTableColumn(#"Removed Columns", "Custom", {"Data"}, {"Data"}),
    #"Split Column by Delimiter" = Table.SplitColumn(#"Expanded Custom", "Name", Splitter.SplitTextByEachDelimiter({" "}, QuoteStyle.Csv, false), {"Download", "Location"}),
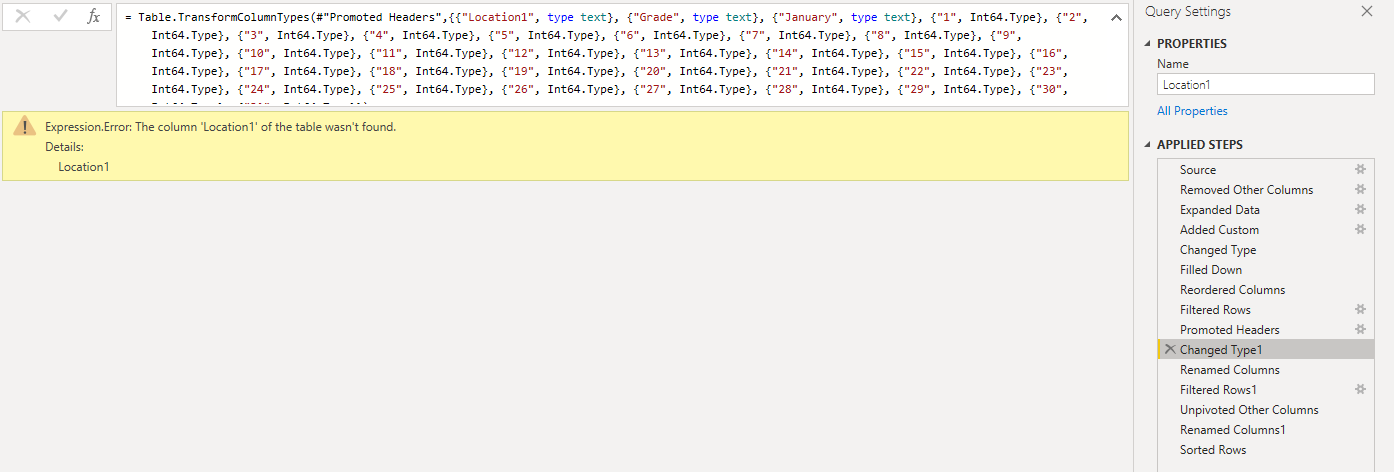
    #"Changed Type1" = Table.TransformColumnTypes(#"Split Column by Delimiter",{{"Download", type date}, {"Location", type text}}),
    #"Calculated Start of Month" = Table.TransformColumns(#"Changed Type1",{{"Download", Date.StartOfMonth, type date}}),
    #"Replaced Value" = Table.ReplaceValue(#"Calculated Start of Month",".xlsx","",Replacer.ReplaceText,{"Location"}),
    #"Expanded Data" = Table.ExpandTableColumn(#"Replaced Value", "Data", {"Column1", "Column2", "Column3", "Column4", "Column5", "Column6", "Column7", "Column8", "Column9", "Column10", "Column11", "Column12", "Column13", "Column14", "Column15", "Column16", "Column17", "Column18", "Column19", "Column20", "Column21", "Column22", "Column23", "Column24", "Column25", "Column26", "Column27", "Column28", "Column29", "Column30", "Column31", "Column32"}, {"Grade", "Column1", "Column2", "Column3", "Column4", "Column5", "Column6", "Column7", "Column8", "Column9", "Column10", "Column11", "Column12", "Column13", "Column14", "Column15", "Column16", "Column17", "Column18", "Column19", "Column20", "Column21", "Column22", "Column23", "Column24", "Column25", "Column26", "Column27", "Column28", "Column29", "Column30", "Column31"}),
    #"Added Month" = Table.AddColumn(#"Expanded Data", "Month", each if List.Contains({"January", "February","March","April","May","June","July","August","September","October","November","December"},[Grade]) then [Grade]  else null),
    #"Filled Down" = Table.FillDown(#"Added Month",{"Month"}),
    #"Filtered Rows4" = Table.SelectRows(#"Filled Down", each ([Grade] <> null and [Grade] <> "Grade" and [Grade] <> "Total" and [Grade] <> [Month])),
    #"Running Month" = Table.FromColumns(
	        Table.ToColumns(#"Filtered Rows4") & {fxRunningTotal( List.Buffer(#"Filtered Rows4"[Month]) )},
	        Table.ColumnNames(#"Filtered Rows4") & {"Running Month"}
        ),
    #"Added Date1" = Table.AddColumn(#"Running Month", "Date1", each Date.AddMonths([Download], [Running Month]), type date),
    #"Removed Columns1" = Table.RemoveColumns(#"Added Date1",{"Running Month"}),
    #"Unpivoted Other Columns" = Table.UnpivotOtherColumns(#"Removed Columns1", {"Download", "Location", "Grade", "Month", "Date1"}, "Day", "Number of employees"),
    #"Changed Type" = Table.TransformColumnTypes(#"Unpivoted Other Columns",{{"Number of employees", Int64.Type}}),
    #"Filtered 0" = Table.SelectRows(#"Changed Type", each ([Number of employees] <> 0)),
    #"Extracted Text After Delimiter" = Table.TransformColumns(#"Filtered 0", {{"Day", each Number.From(Text.AfterDelimiter(_, "Column")), Int64.Type}}),
    #"Added Date" = Table.AddColumn(#"Extracted Text After Delimiter", "Date", each Date.AddDays([Date1], [Day]-1), type date),
    #"Removed Other Columns2" = Table.SelectColumns(#"Added Date",{"Date", "Location", "Grade", "Number of employees"})
in
    #"Removed Other Columns2"

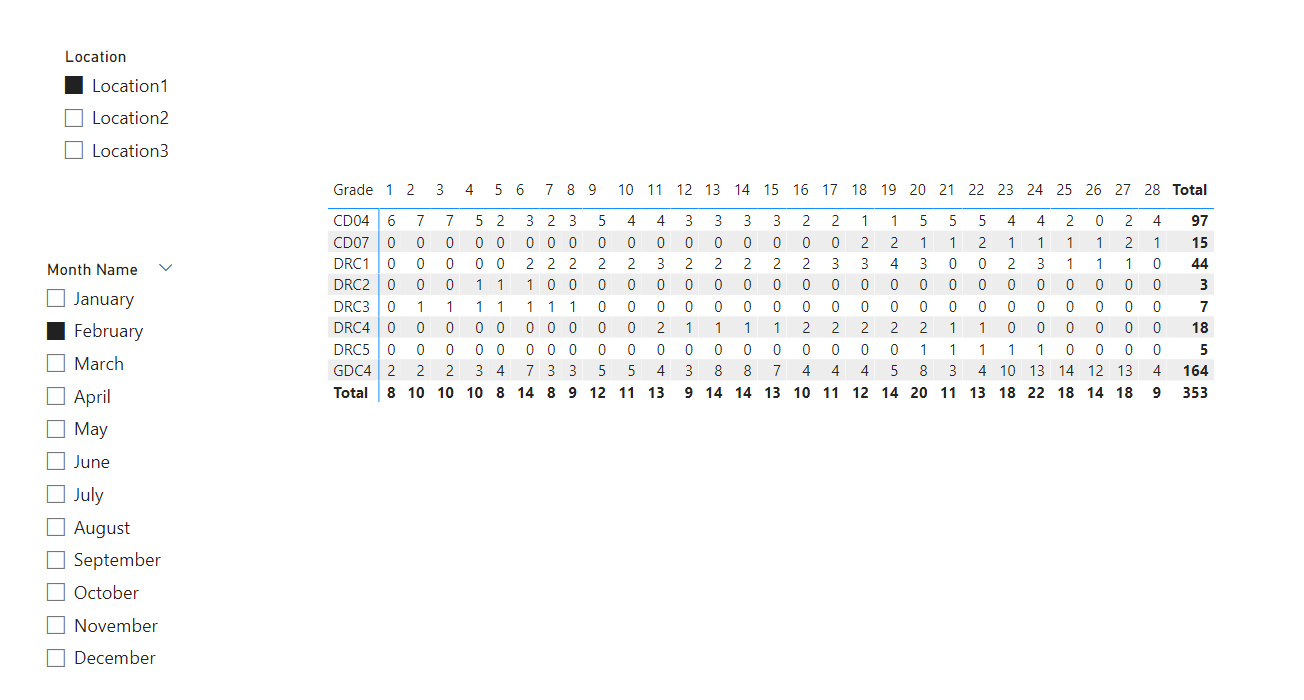
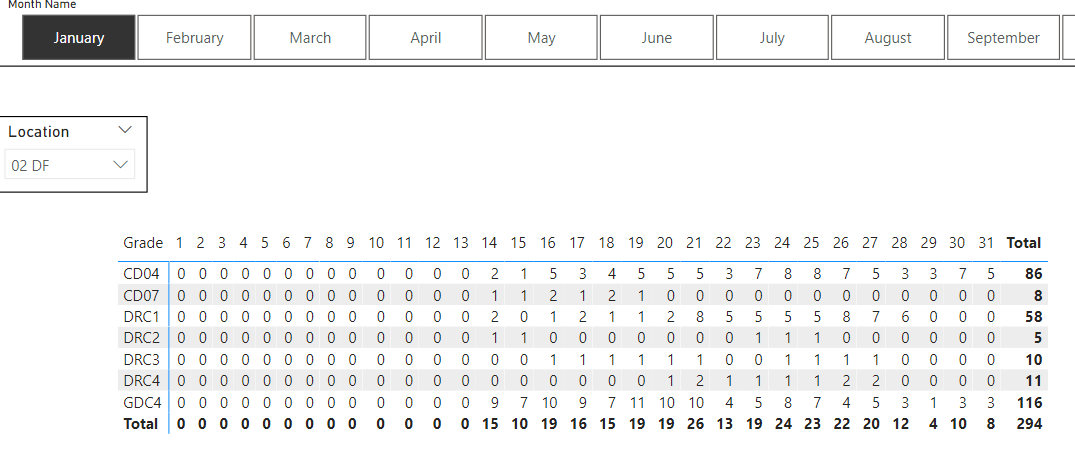
You can load the result to a table, pivot table, pivot graph or the data model.
:warning: 
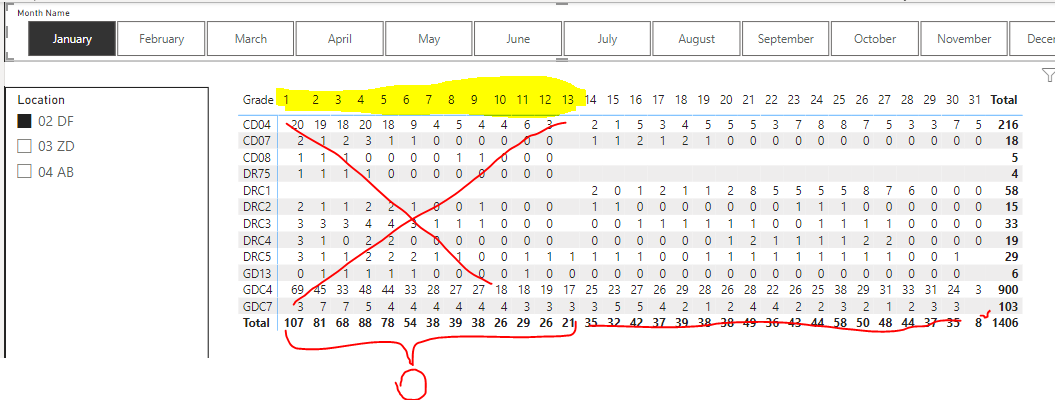
Do not just slice by month name. :blush:

Regards,
Matthias

Hi @jps

Could you please advise how I should carry on with your previous idea - I will get more data for future months and I can manually seperate file for 2022 and 2023 etc.
Could you please asist .

Grateful as always-

Iwona

Hey @Iwona,

Did you try the solution provided by @Matthias . I would strongly recommend that you try that and avoid any manual task. It will make your life so much easier.

with the solution i gave, you will have to save the files separately for every year. and follow the naming convention. and they can all be in the same folder.

2 Likes

@jps

Your solution is easier to understand and I don’t mind doing some naming changes.
@Matthias’ solution is absolutely amazing for more advanced users assume and I will go through it later on.

Could you please share with me your ideas and steps which I should apply . I believe there is work for specific names for files and changes in code in Power Query.

Please :pray: help.

Iwona