Breaking down the data from rows to columns

Hi there,

I am about to pull some data into my Dashboard. As you can see here attached, the data currently is showing my income breakdown like this:

Income
40 Donation
400 Donation A
1 Jan 2020

What I would like to do is to break down so that there is one column that shows whether a transaction is an income or expenditure, another column that says, for example, it is 40 donation, other one showing that it is 400 Donation A and then another column for my dates so that I can link it to my date table.

Any help would be greatly appreciated.

have you considered using power query to modify at the time of import?

Hi @C9411010. I am at the query editor stage and have not yet uploaded the data. So, this question is in relation to data staging at the query editor level.

can you attach the pbix and i can convert for you and send you instructions on how i did it

The data is pulled from QuickBooks Online so if I send it to you, you wont see anything there. The picture is the view from Query Editor. I dont know if unpivot or transpose is going to help me but not sure the exact procedure.

Do you want me to create a mock copy of it from an excel?

Thanks for posting your question @Jawed. To receive a resolution in a timely manner please make sure that you provide all the necessary details on this thread.

Here is a potential list of additional information to include in this thread; demo pbix file, images of the entire scenario you are dealing with, screenshot of the data model, details of how you want to visualize a result, and any other supporting links and details.

Including all of the above will likely enable a quick solution to your question.

i think that would help… if you can down load some sample data in excel and send it over…, i can try and upload excel file in power bi

Thank you so much. Here is the excel file. As you will notice, there is quite a few information under the column, “Date” which need their own separate columns.

data.csv (368.7 KB)

Hi @C9411010. I think I have found the best example in excel. I am pulling data from QuickBooks Online. Here is the report exported from QBO to excel. As you can see, there is a bit of a hierarchy. I have got the original report in one tab and what I would like it to be in the next one. I hope this is useful information as overcoming this challenge will make my day.

Living Wage Foundation_Profit and Loss Detail.xlsx (63.8 KB)

Hello @Jawed,

I saved the sample file you provided on C:/Data and connected to the file from Power BI.
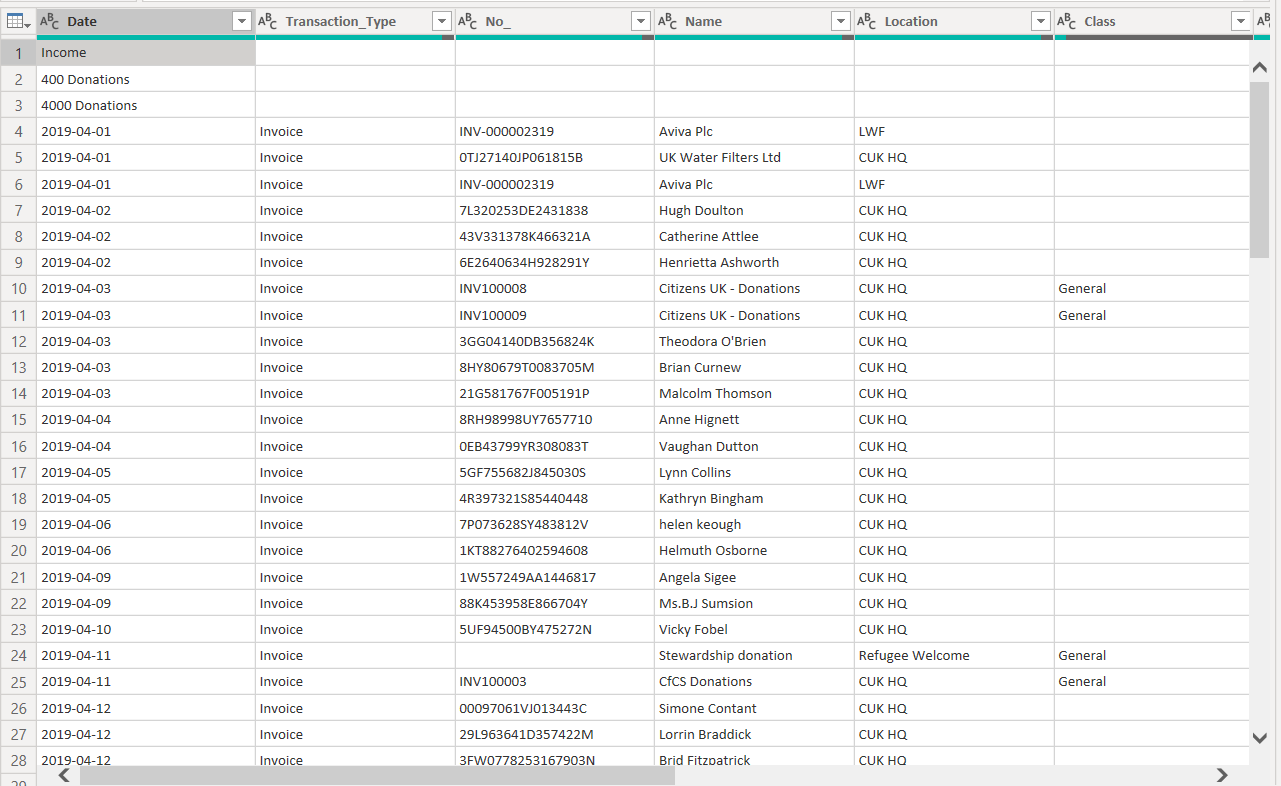
The result is this file (check the Transform Data tab)

Living Wage Foundation - Power Query.pbix (59.9 KB)

In case the file is not uploading correctly this is the M code inside:

// Raw_Data_Connection
let
  Source                 = Excel.Workbook(
    File.Contents("C:\Data\Living Wage Foundation_Profit and Loss Detail.xlsx"), 
    null, 
    true
  ),
  #"Original Data_Sheet" = Source{[Item = "Original Data", Kind = "Sheet"]}[Data],
  #"Changed Type"        = Table.TransformColumnTypes(#"Original Data_Sheet", {{"Column1", type text}})
in
  #"Changed Type"

// Result
let
  Source                            = Raw_Data_Connection,
  #"Removed Top Rows"               = Table.Skip(Source, 4),
  #"Removed Bottom Rows"            = Table.RemoveLastN(#"Removed Top Rows", 5),
  #"Promoted Headers"               = Table.PromoteHeaders(#"Removed Bottom Rows", [PromoteAllScalars = true]),
  #"Filled Down"                    = Table.FillDown(#"Promoted Headers", {"Column1"}),
  #"Trimmed Text"                   = Table.TransformColumns(#"Filled Down", {{"Column1", Text.Trim, type text}}),
  #"Removed Top Rows1"              = Table.Skip(#"Trimmed Text", 2),
  #"Filtered Rows"                  = Table.SelectRows(
    #"Removed Top Rows1", 
    each not Text.StartsWith([Column1], "Total")
  ),
  #"Inserted Text Before Delimiter" = Table.AddColumn(
    #"Filtered Rows", 
    "Text Before Delimiter", 
    each Text.BeforeDelimiter([Column1], " "), 
    type text
  ),
  #"Added Custom"                   = Table.AddColumn(
    #"Inserted Text Before Delimiter", 
    "Account Code", 
    each if Text.Length([Text Before Delimiter]) = 3 then [Column1] else null
  ),
  #"Filled Down1"                   = Table.FillDown(#"Added Custom", {"Account Code"}),
  #"Reordered Columns"              = Table.ReorderColumns(
    #"Filled Down1", 
    {
      "Account Code", 
      "Column1", 
      "Date", 
      "Transaction Type", 
      "No.", 
      "Name", 
      "Memo/Description", 
      "Split", 
      "Amount", 
      "Balance", 
      "Text Before Delimiter"
    }
  ),
  #"Filtered Rows1"                 = Table.SelectRows(#"Reordered Columns", each ([Date] <> null)),
  DetailsDone                       = Table.RemoveColumns(#"Filtered Rows1", {"Text Before Delimiter"}),
  Custom1                           = Source,
  #"Removed Top Rows2"              = Table.Skip(Custom1, 6),
  #"Kept First Rows"                = Table.FirstN(#"Removed Top Rows2", 1),
  #"Removed Other Columns"          = Table.SelectColumns(#"Kept First Rows", {"Column1"}),
  #"Trimmed Text1"                  = Table.TransformColumns(
    #"Removed Other Columns", 
    {{"Column1", Text.Trim, type text}}
  ),
  Type                              = Table.RenameColumns(#"Trimmed Text1", {{"Column1", "Type"}}),
  #"Merged Queries"                 = Table.NestedJoin(
    Type, 
    {"Type"}, 
    DetailsDone, 
    {"Account Code"}, 
    "Details", 
    JoinKind.FullOuter
  ),
  Expanded                          = Table.ExpandTableColumn(
    #"Merged Queries", 
    "Details", 
    {
      "Account Code", 
      "Column1", 
      "Date", 
      "Transaction Type", 
      "No.", 
      "Name", 
      "Memo/Description", 
      "Split", 
      "Amount", 
      "Balance"
    }, 
    {
      "Account Code", 
      "Column1", 
      "Date", 
      "Transaction Type", 
      "No.", 
      "Name", 
      "Memo/Description", 
      "Split", 
      "Amount", 
      "Balance"
    }
  ),
  #"Filled Up"                      = Table.FillUp(Expanded, {"Type"}),
  IncomeAddedFinal                  = Table.SelectRows(#"Filled Up", each ([Account Code] = "461 Accreditation")),
  Custom2                           = Source,
  #"Removed Top Rows3"              = Table.Skip(Custom2, 5),
  #"Kept First Rows1"               = Table.FirstN(#"Removed Top Rows3", 1),
  #"Removed Other Columns1"         = Table.SelectColumns(#"Kept First Rows1", {"Column1"}),
  #"Trimmed Text2"                  = Table.TransformColumns(
    #"Removed Other Columns1", 
    {{"Column1", Text.Trim, type text}}
  ),
  FinanceStatement                  = Table.RenameColumns(#"Trimmed Text2", {{"Column1", "Finance Statement"}}),
  #"Merged Queries1"                = Table.NestedJoin(
    FinanceStatement, 
    {"Finance Statement"}, 
    IncomeAddedFinal, 
    {"Type"}, 
    "Details", 
    JoinKind.FullOuter
  ),
  #"Filled Up1"                     = Table.FillUp(#"Merged Queries1", {"Finance Statement"}),
  #"Expanded Details"               = Table.ExpandTableColumn(
    #"Filled Up1", 
    "Details", 
    {
      "Type", 
      "Account Code", 
      "Column1", 
      "Date", 
      "Transaction Type", 
      "No.", 
      "Name", 
      "Memo/Description", 
      "Split", 
      "Amount", 
      "Balance"
    }, 
    {
      "Type", 
      "Account Code", 
      "Column1", 
      "Date", 
      "Transaction Type", 
      "No.", 
      "Name", 
      "Memo/Description", 
      "Split", 
      "Amount", 
      "Balance"
    }
  ),
  #"Filtered Rows2"                 = Table.SelectRows(#"Expanded Details", each ([Type] = "Income")),
  #"Changed Type"                   = Table.TransformColumnTypes(#"Filtered Rows2", {{"Account Code", type text}}),
  #"Renamed Columns"                = Table.RenameColumns(#"Changed Type", {{"Column1", "Account Sub-Code"}}),
  #"Changed Type with Locale"       = Table.TransformColumnTypes(#"Renamed Columns", {{"Date", type date}}, "en-NZ"),
  #"Changed Type1"                  = Table.TransformColumnTypes(
    #"Changed Type with Locale", 
    {{"Amount", type number}, {"Balance", type number}}
  )
in
    #"Changed Type1"

If you liked my solution please give it a thumbs up :+1:.

If I did answer your question please mark my post as a solution :white_check_mark:.

Thank you !

Cristian

Hi @cristian.angyal. Thank you so much for the help. I just noticed that one big thing was missing in the excel file. And that is the fact that those rows underneat the account columns are not empty in the pbx report when I pull them live from QuickBooks online. I have adjusted the excel file to show the challenge I have. I basically want to split the date and account information.

See if you can achieve same thing when date is tucked underneath the codes.

Living Wage Foundation_Profit and Loss Detail.xlsx (63.5 KB)

1 Like

Hi @Jawed,

I saved your new file sample in the same local folder *C:\Data* with a new name: “Living Wage Foundation_Profit and Loss Detail_last version.xlsx” and added few more steps to the code to get the first column as it was in your previous file.

This is the new PBI File with the right data formatted inside:

Living Wage Foundation - Power Query_last version.pbix (155.1 KB)

If you liked my solution please give it a thumbs up :+1:.

If I did answer your question please mark my post as a solution :white_check_mark:.

Thank you !

Cristian

1 Like

Hi @cristian.angyal. This is wonderful. Thank you so much. Would you kindly please let me know a little bit about your approach to breaking the column down to all of those separate columns? I can see it on the steps but it is really nice to hear your thought process. The reason I ask is that I have got half a dozen of these reports with some slight differences so knowing how to tackle the problem would be very much appreciated and it will definitely set me up to get things moving fast.

Once again, thank you for your help.

Hi @Jawed,

The main thing when doing this kind of work is to get the “levels” on different columns so you can Fill Down afterwards.
Here I used two “tricks” mainly: one was to check what is NOT Date and replace the Errors with nulls and then tried to get the Accounts and use their length (as number of characters) to add additional columns.
Hope this helps.

Regards,

Cristian

Thank you, @cristian.angyal. I am going through the Steps and am replicating. It is so useful. So far, the only other question I have is after you have used the text length to create the “account code”, I can see that the column that showed the length has been taken away and the step simply says, “DetailsDone”. I wasnt sure of the step as to whether you removed the column, hid it or was it something else?

And very last question (hopefully). As I am going through the stages, I can see that once you have created the Account Code and renamed the account sub-code, you are creating the Type and the Finance Statements. The step simply says “Custom2” for creating the type and then “Custom2” for creating the finance statement columns. I wondered which step/function you took. Thank you again.